Archives for category: bread

Processed with VSCOcam with f2 preset

This winter has been rough on me, and I’m sure it’s been tough for a lot of you too.  I check the weather on my phone and see no hope for days.  Temperatures lingering well below freezing seem to be the norm now.  Of course, there are snippets of beauty amongst this snow and ice.  Scenes that would rival any tropical paradise in their splendor.

IMG_5166

On the positive side, I do love me some winter fashion.  I love chunky knits, boots, pom-pom hats, and huge scarves wrapped around a thousand times. I’ve gotten to wear crimson and berry-toned lip colors, which look out-of-place in the warmer months.  I have also been loving  goth-inspired nail polishes – very moody and a far cry from the fuchsias and tangerine reds I wear in the summer.

Processed with VSCOcam with f2 preset

There have also been cozy times I get to share with my husband.  Him and I exploring the city and finding a new café.  I will get a latte and he will get a hot chocolate because he has an abhorrence that stems from childhood towards coffee.  We’ll share a cookie or a croissant or both and discuss things in the world that we don’t understand or can’t wrap our heads around, future vacations we want to take, or whatever may come up.

We’ll also laze around at home more often on the weekends.  In the summer I like to be out and about.  This winter I’m enjoying staying in more. Usually I’m the type of person who gets in a very bad mood if we don’t have weekend plans.  But this winter I’ve been happy to stay-in on a Friday night and cook a nice dinner for just the two of us.  Of course friends are always welcome, but rather than going out, sometimes it’s nice to stay snug and comfortable at home.  When Sunday morning comes around I’m also skipping the usual restaurant brunches and opting for an omelet or pancakes or French toast at home.  I’m not big on sweets for breakfast, but sometimes a nice french toast satisfies like nothing else.

Processed with VSCOcam with f2 preset

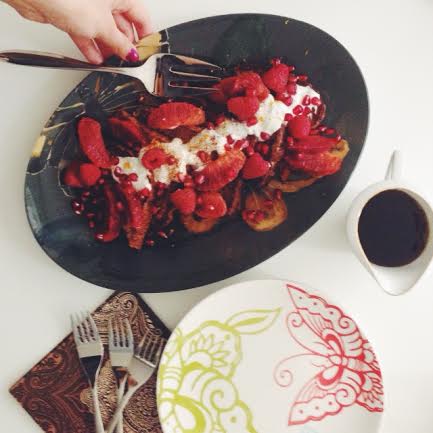
When making French toast I don’t really measure anything out.  It’s an effortless dish that will come together if you have the basic ingredients.  That’s why I love making it.  I paired it here with ruby-toned fruits: blood oranges, pomegranates, and raspberries.  And I always use cinnamon and vanilla in my french toast.  You can add other spices like cardamom or ground cloves.  But the combination of cinnamon and vanilla is my favorite and will make your whole kitchen smell very welcoming.

Processed with VSCOcam with f1 preset

Cinnamon and Vanilla French Toast with Ruby Colored Fruits

I am providing a loose recipe here, because I really feel French toast is foolproof unless you burn it in the pan. 😉

Ingredients

oil or butter for frying

bread of your choice, sliced a little thicker than usual and day old is best.  I usually have whole wheat or sunflower toast, but brioche and challah are optimal.

eggs, use 1 egg for every 3 slices of toast

milk of your choice, use about 1 cup for every 3 slices of toast

sugar, to taste – I like to use raw sugar or sugar with larger crystals so that it caramelizes nicely on the toast.

vanilla extract or a vanilla bean scraped, start with 1 teaspoon of vanilla extract

ground cinnamon, 1/2 teaspoon for 3 slices of toast, you can  adjust the amount according to your taste

a pinch of sea salt

an array of fruits or your choice, I used blood oranges, pomegranates, and raspberries. (fruit combination inspired by @thedelicious on instagram)

chopped nuts, for serving (optional)

to serve: whipped cream or sour cream or crème fraîche or yogurt, orange zest, cinnamon, and pure maple syrup

Method

Beat eggs with milk, add in sugar, cinnamon, vanilla, and a pinch of salt in a wide rectangular dish.  Soak the bread until the egg custard is absorbed on each side.

Heat a large frying pan with oil or butter on medium heat.  Add the soaked toast pieces in the pan.  Cook for about 2-3 minutes per side or until golden.  Top with the blood oranges, pomegranates, raspberries, nuts, and other topping of your choice.

I’m an odd one who likes to have a sandwich for breakfast.  I’ll pass up eggs, cereal, french toast, pancakes, waffles for a sandwich.  Though I like all of those things, I prefer this sandwich.  When I visit my parents, I’m always sure to get some jalapeño chicken sausage and make a sandwich out of it for breakfast.  Unfortunately, I can’t find any pork-free chicken sausage here, though I’m sure they exist, so I opt for this vegetarian version.

With or without chicken sausage I am a lover of cheese, bread with almost any other combination.  I like to add basil, chives, and/or cilantro as well.  My sister and I came up with this (genius ;)) combination for breakfast.  We’re big on sandwiches and are known to turn meals into a sandwich.  All you really need is bread.

Spicy chilies and flavors are also a favorite of mine.  Hence, the radishes and jalapeños .  I think everything melds so nicely here: spicy, creamy, and fresh.  The textures all work, too.  Not too shabby if I say so myself.  I have created the perfect form of food in a sandwich.  Yes, I’m being totally sarcastic and I’m sure someone reading this will turn their nose up at this and think, “what is she going on about???”  Regardless, this is my favorite breakfast, lunch, and/or dinner for when I’m not in the mood for something that takes effort to make and after eating this sandwich I’m truly satisfied.

My Favorite Sandwich

There are absolutely no directions on how to make this sandwich.  I’ll give you some rough ideas and you go ahead and make your perfect sandwich.

Ingredients

nice hearty bread (I used honey, nut, flax)

radishes

avocados

good quality tomatoes, like heirloom

cucumbers

jalapeño peppers (fresh or pickled)

cheese of your choice (I used a semi-soft sheep’s milk cheese.)

lime juice

herbs: basil, chives, cilantro, dried herbs de Provence

sea salt

extra-virgin olive oil

Method

Toast bread drizzle on olive oil and dress with toppings of your choice.  I make them open-faced.   Easy!

“You just want me to be fat and making parathas in the kitchen all day,” my mother would exclaim when my sister and I got into a little fight with her.  You see, when my sister and I were teenagers my mother would often wear the same sort of clothes we wore and we would become incredibly annoyed.  Maybe she was right in a way.  We did want her to do more baking and wear ugly sweaters like everyone else’s moms.  My mother always had a young spirit and had a young outer façade to match it.  My sister and I have since gotten over our teenage qualms and are happy to have our mom raid our closet and vice versa.

She saw making parathas and rotis as the ultimate form of subservience, the sign of an unhappy woman.  I know that it was a silly thing for her to think, regardless I developed the same sort of picture in my mind.  When I got married, my mom said to me, “there’s no need to make roti everyday.”  That was certainly not in my plan and I only attempted to make them two years after marriage.  This was because I was inspired by of all the fabulous bakers and adventurous bloggers I came into contact with.

In stark contrast to my own mother is my mother-in-law.  I only hinted at the prospect of trying to make rotis and she was back the same day with a tawa.  She made sure to buy me atta and proceed on giving me a lesson in the art of making rotis.  For indeed it is an acquired art, you can not master it at one go.  When I went back to my own home, my mother-in-law would call and ask how the roti and paratha making was going.  I would fib and say I tried and that my roti were not coming out round.  These white lies were just to make her feel better, because she felt her son was being taken care of if he was receiving fresh roti and parathas.

One day, I bit the bullet and tried.  I got over my preconceived notions and complexes related to roti and paratha making.  My first few attempts were pathetic, a real blow to my self-esteem.  I consider myself a decent cook and to fail so miserably at something so simple was embarrassing.  My roti resembled and tasted like cardboard and I hadn’t even dived into the world of parathas yet.  Thankfully, slowly but surely I got there and now I can confidently say that I can make roti and paratha.

This is not going to be a daily routine in my household though, a special biannual treat, if you will.  After all, I am still my mother’s daughter and I am glad she raised me how she did.

Aloo Parathay

Makes 4

Ingredients

for the dough:

2 1/2 cups Durum wheat flour, roti or chapati flour (I use Golden Temple)

3/4-1 1/2 cup of lukewarm water

for the filling:

1 tablespoon canola or vegetable oil

3 boiling potatoes, peeled and cubed into a medium dice

1/2 a red onion, finely chopped

1/4 cup chopped cilantro

a few leaves of mint, chopped

green chilies, chopped (as many as you like, I used 2)

1/2 teaspoon cumin seeds

1/2 teaspoon coriander seeds

pinch of ajwain (carom) seeds

red chili powder/cayenne pepper, to taste

crushed red chilies, to taste, optional

salt, to taste

canola or vegetable oil, for frying

Method

Prepare the dough by kneading the flour and water together.  Add the water a little at a time until the dough just comes together.  You may not need all of the water.  I knead by hand, but you can also do this in a food processor or stand mixer with the hook attachment.

Knead for about five minutes until the dough is firm yet elastic.  Place the dough in a bowl and dab on some water over the dough so it doesn’t form a skin and cover it with plastic wrap.  Let the dough rest for at least a few hours in the fridge or on the counter if you are using it the same day.

Once ready to make the parathas, let the dough sit at room temperature for a few hours if it was in the fridge.  The dough can be stored in the fridge for up to 3 days.

To make the potato filling boil the potatoes in some cold water in a pot on medium to medium high heat until the potatoes are fork tender and easily mashed, about 15-20 minutes.  Drain the water from the potatoes and mash them with a fork or potato masher.  While the potatoes are boiling, toast the cumin and coriander seeds in a dry fry pan on medium heat for about 5 minutes.  Transfer the spices to a mortar and pestle and coarsely grind them.

Next, add in the oil, onions, cilantro, green chilies, all the spices to the mashed potatoes and mix everything together. Set aside.

Now, you will have to roll out the dough.  Separate the dough into eight even-sized balls.  You will need two balls per one paratha.  Roll each ball out so that is is smooth with no seams.  Next, flatten out the ball with you hand so that it becomes a small circle.  Put your thumb at the center of the circle and press your fingers at the edges of the circle as to expand the circle.  Press your fingers all around and rotate the circle until it starts getting bigger.  At this point, use a rolling-pin to roll out a circle with a 6 inch diameter.  For each paratha you will need two 6 inch diameter circles.

Place 1/2 a cup of the potato filling over one 6 inch diameter circle, leaving an inch free all around.  Place the second dough circle on top and using your fingers pinch the edges shut.  Using your rolling pin, roll out the paratha until it approximately has a 10 inch diameter.

Heat your tawa, griddle, or frying pan to medium heat and place the paratha on the warm surface.  Let the paratha cook like this for a minute or two then flip it over and using a pastry brush, brush on about a tablespoon of oil on the top of the paratha.  Flip it again so that the oiled side is at the bottom.  Grease the top with another tablespoon of oil.  Once the bottom has turned golden brown, about 2-3 minutes flip it over and brown the other side.  Once both sides are golden brown remove from the heat and repeat the process until the dough is finished.

Serve with raita, achar, or green chutney.  I particularly like paratha with shami kebabs.

My younger sister and I are practically in constant contact.  She is half a world away from me in Dubai, but we use all forms of communication whether it is Blackberry messenger, MSN messenger, Facebook, Twitter, Gmail chat, and Skype to keep in touch.  Sometimes we have multiple conversations going on at the same time through these various messaging programs.  We are even known to chat with each other online while in the same room.  When we all come to my parents’ house we call our dining room table the “IT Center.”  My sister, my husband, my sister’s fiancé, my cousin, Henna, and myself all have our laptops open  on the table doing our own thing and also chatting with each other.  If anyone else ever walked in, I’m sure they would think we were not completely “normal.”

The reason I mention these vast forms of communication is because my sister has been asking me to make a Middle Eastern platter, so my husband and I can eat the same sorts of things she is enjoying in Dubai.  For the past few weeks, she has been messaging me about labneh (thickened yogurt cheese) and if I bought it yet.  My answer is always no, because I can’t get any in Kingston.  So, she told me to make it.  My attempt to make it failed miserably, because I went to the only kitchen supply store in Kingston to get  cheesecloth to drain the water out of yogurt and they were sold out and would not be getting any more for two weeks.  I told her this and she was quite upset.  As you can see, we are extremely passionate about food.

Shanklish Cheese- a semi soft sheep's milk cheese popular in Syria and Lebanon. The cheese balls are rolled in sumac, chili, oregano, and spices.

The first thing we ask each other everyday is what did you eat so far today.  Notice, the “so far” because we are never really done eating.  You can imagine my sister’s joy when I told her we were going to Toronto for the weekend.  The first thing she said was if I was going get the things for the Middle Eastern platter.  I got reminder after reminder, just in case I could ever forget.  My husband tells me to shut the sound off on the BB because of all the alerts I get from my sister’s chats.  When I finally was able to go to the Middle Eastern market, I was on BBM with my sister.  Mind you, I am not the type of person who is constantly on my BB, it’s not even mine, it’s my husband’s and I borrow it when I want to talk to my sister.  I actually get annoyed when people are out with you and spending more time with their phone than you.  Eating my own words, I became that person in the Middle Eastern Market.  I wasn’t paying attention to anyone around me and just in search of what my sister was telling me to get.

I love Middle Eastern food, so I enjoyed this “quest .”   I have not travelled extensively in the Middle East, only to Egypt and the UAE, though I would love to. I went to Dubai recently and the food there was just amazing.  Ever since my return from Dubai, I have been hooked on it.  My husband also grew up in Saudi Arabia, so he has the taste for Middle Eastern food as well.

As I mazed through the market, I filled my cart with all sorts of different foods.  I stocked up because some things are hard for me to find here.  My sister, half way across the world was content with my purchases and satisfied with the incognito pictures I was taking of the cheeses, olives, nuts, and sweets.

The thing I love about this food is that it is fresh and easy.  I didn’t do much cooking at all, it was all just assembly.  A platter like this is fun to serve as an appetizer when you have people over because it is like a bounty of food in the middle of the table for everyone to share.  Individually plated formal dinners can be nice too, but there’s nothing like breaking bread together and enjoying fresh delicious food.

Middle Eastern Platter

There are no set rules here.  Use whatever you suits your taste-buds  This time I used a bunch of radishes, Lebanese cucumbers, mint, tomatoes, lemons for squeezing, grilled sujuk sausages, labneh topped with za’atar olive oil and pine nuts, Lebanese black olives, shanklish rolled in thyme, sumac, and oregano, crusty grilled bread drizzled with olive oil, salt, and pepper.

Other options could include herb roasted nuts, dried fruits such as apricots and dates, phyllo pastries, hummus and other dips, salads such as fattouch, tabouleh, halloumi cheese, manakeesh, roasted vegetables, mixed greens.

Use a large platter and bunch the different items together in clusters and arrange everything in an attractive manner.  Let it be messy and organic.  I do not like a platter to look too perfect.

This recipe has been requested numerous times.  I did not intend on posting it, but I will since it had such rave reviews.  It is so simple to make and was the result of having nothing to eat on a weekend breakfast.  I am including the recipe that yields a serving of 4 slices of bread.  Just double or triple, etc if you need to make a larger quantity.

Ricotta and Raspberry Stuffed French Toast

Makes 4 slices

Ingredients

4 slices of bread, I only had farmer’s market whole wheat on hand, but the best choice would be Brioche or Challah

1 egg

3-4 tablespoons milk

1/2 teaspoon pure vanilla extract

tiny pinch of nutmeg

1/4 teaspoon ground cinnamon (or more if you want it more “cinnamony”)

1 tablespoons sugar

pinch of salt

vegetable oil or butter for frying

fresh berries, for garnish, optional

1 tablespoons toasted chopped walnut, for garnish, optional

1 tablespoon powdered sugar, for garnish, optional

some mint leaves for garnish, optional

maple syrup, optional

for the ricotta filling:

3/4 a cup part-skim ricotta cheese

2 tablespoons sugar

1/4 teaspoon pure vanilla extract

1/4 fresh raspberries

1 tablespoon toasted chopped walnuts, optional

Method

First make the ricotta filling.  Using an electric mixer beat all the filling ingredients together (except the almonds) on medium speed until it is light and fluffy, about 2 minutes.  Next, mix in the nuts.  Set aside.

Heat a frying pan on medium heat with some oil or butter.  In a shallow bowl beat the egg with the milk, sugar, nutmeg, cinnamon, vanilla extract and salt.  Dip the bread slices in this mixture.  and place about 2 tablespoons of the ricotta mixture between 2 slices of bread, sort of like making a sandwich.  Fry the “sandwich” in the frying pan until golden brown on both sides.  Repeat until all your slices of bread are finished.  Garnish with any remaining ricotta mixture, berries, and powdered sugar.  Serve with maple syrup if you would like.

My mother-in-law is a star in the kitchen, especially when it comes to Pakistani cuisine.  You ask for it and she will make it, happily.  Some people do not bother with serving others food.  They are stingy or not gracious hosts.  These comments could never be associated with my mother-in-law.  She loves feeding her friends and family.  I always tell her, “Aunty, you should open up a restaurant.”  If it was not so tiring and such a big commitment, I think it would be ideal for her.

She goes all out with her preparations.  I love seeing this quality in people, the trait of being a great host.  Inviting someone to your house should not be seen as a hassle, but an occasion to share food and good times with others.  She makes very elaborate and time-consuming dishes when she is having a gathering.  She would rather not invite people over than make something simple that you would eat in your house on a daily basis.  I am like her in some ways.  I do take pride in inviting people over to my place.  In this day and age, I understand that people are busy and entertaining is the last thing on their minds.  But, there is something so appealing and welcoming about a good host.

I mention all of this, because my mother-in-law also makes her own fresh naans.  Most of the time, she lives in Dubai, but she also visits Toronto quite frequently.  Both of these places have no shortage of establishments that serve up fresh naans.  Yet, she takes great pride in her kitchen and would rather serve something fresh and home-made.  Making naan for 2-3 people, like I have made here is not that grueling.  However, she will make naans for 15-20 people with a smile on her face the whole time.

I hope you try this recipe, it is really worth it to put in the effort.  The recipe is not hard at all, just a little time-consuming.  The result is so worth it.  They are usually made in a tandoor or clay oven.  Most of us are not equipped with one in our kitchen, so the broiler is the next best option.  Hot, fresh, naans enhance any Pakistani or Indian dish as they serve the place of an extra utensil.  They are chewy and oh so delicious.  I am very lucky to have such a great mother-in-law who is able to teach me such recipes that I would have not tried making before.

Naan

Makes 8 naans

Ingredients

4 cups of all-purpose unbleached flour (organic)

1 1/2 tablespoons dry-active yeast

1 cup warm water

1 tablespoon sugar

1/2 cup milk

3/4 cup vegetable oil

2 teaspoons salt, or to taste

1 teaspoon baking powder

3/4 cup of yogurt

sesame seeds, for garnish (optional)

kalonji seeds, for garnish (optional)

softened butter

extra water and flour, if necessary

Method

Proof the yeast with the warm water and sugar, for about 5 minutes, or until the mixture starts to form bubbles.  Sift together the flour with the salt and baking powder.  Add in the yeast mixture, milk, and 1/2 cup of oil.  Knead the dough together until it forms a ball.  If the dough is too sticky add extra flour to the dough and likewise if it is too dry, add water.  Allow to rise in a bowl covered with a damp kitchen towel for 4 hours.  Keep the bowl in a warm place, like over the stove.

Meanwhile mix the yogurt with the remaining oil in a bowl and set aside.

After four hours knead the dough slightly.  Separate the dough into 8 equal balls.  Allow the balls to rise for 30 minutes.  Then, using a rolling-pin roll the balls into 8-9 inch rounds.  Use your fingertips to make indentations in the dough.

Preheat your broiler.  Heat a griddle or frying pan on the stove on medium heat.  Brush the yogurt/oil mixture on top of the naans and cover with sesame seeds.  You can add a few kalonji seeds, if you like.  Next cook the bottom of the naans on the griddle or frying pan for about 4 minutes.  Then transfer them as the bottoms are browned onto a baking tray underneath the broiler.  This will brown the top of the naans.  Keep each naan in the oven for about 4 minutes, or until the top is slightly golden.  If you wish you can dab a little butter on top of the hot naans.  Serve them right away, they taste best right from the oven.