Archives for posts with tag: Brunch

Processed with VSCOcam with f2 preset

This winter has been rough on me, and I’m sure it’s been tough for a lot of you too.  I check the weather on my phone and see no hope for days.  Temperatures lingering well below freezing seem to be the norm now.  Of course, there are snippets of beauty amongst this snow and ice.  Scenes that would rival any tropical paradise in their splendor.

IMG_5166

On the positive side, I do love me some winter fashion.  I love chunky knits, boots, pom-pom hats, and huge scarves wrapped around a thousand times. I’ve gotten to wear crimson and berry-toned lip colors, which look out-of-place in the warmer months.  I have also been loving  goth-inspired nail polishes – very moody and a far cry from the fuchsias and tangerine reds I wear in the summer.

Processed with VSCOcam with f2 preset

There have also been cozy times I get to share with my husband.  Him and I exploring the city and finding a new café.  I will get a latte and he will get a hot chocolate because he has an abhorrence that stems from childhood towards coffee.  We’ll share a cookie or a croissant or both and discuss things in the world that we don’t understand or can’t wrap our heads around, future vacations we want to take, or whatever may come up.

We’ll also laze around at home more often on the weekends.  In the summer I like to be out and about.  This winter I’m enjoying staying in more. Usually I’m the type of person who gets in a very bad mood if we don’t have weekend plans.  But this winter I’ve been happy to stay-in on a Friday night and cook a nice dinner for just the two of us.  Of course friends are always welcome, but rather than going out, sometimes it’s nice to stay snug and comfortable at home.  When Sunday morning comes around I’m also skipping the usual restaurant brunches and opting for an omelet or pancakes or French toast at home.  I’m not big on sweets for breakfast, but sometimes a nice french toast satisfies like nothing else.

Processed with VSCOcam with f2 preset

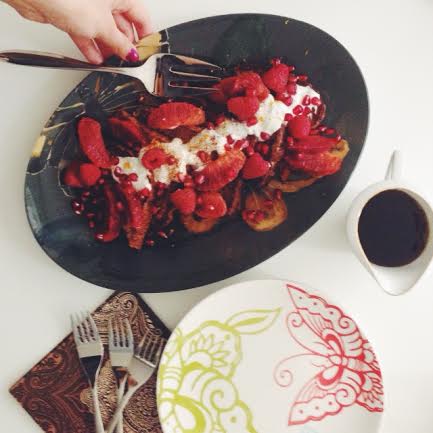
When making French toast I don’t really measure anything out.  It’s an effortless dish that will come together if you have the basic ingredients.  That’s why I love making it.  I paired it here with ruby-toned fruits: blood oranges, pomegranates, and raspberries.  And I always use cinnamon and vanilla in my french toast.  You can add other spices like cardamom or ground cloves.  But the combination of cinnamon and vanilla is my favorite and will make your whole kitchen smell very welcoming.

Processed with VSCOcam with f1 preset

Cinnamon and Vanilla French Toast with Ruby Colored Fruits

I am providing a loose recipe here, because I really feel French toast is foolproof unless you burn it in the pan. 😉

Ingredients

oil or butter for frying

bread of your choice, sliced a little thicker than usual and day old is best.  I usually have whole wheat or sunflower toast, but brioche and challah are optimal.

eggs, use 1 egg for every 3 slices of toast

milk of your choice, use about 1 cup for every 3 slices of toast

sugar, to taste – I like to use raw sugar or sugar with larger crystals so that it caramelizes nicely on the toast.

vanilla extract or a vanilla bean scraped, start with 1 teaspoon of vanilla extract

ground cinnamon, 1/2 teaspoon for 3 slices of toast, you can  adjust the amount according to your taste

a pinch of sea salt

an array of fruits or your choice, I used blood oranges, pomegranates, and raspberries. (fruit combination inspired by @thedelicious on instagram)

chopped nuts, for serving (optional)

to serve: whipped cream or sour cream or crème fraîche or yogurt, orange zest, cinnamon, and pure maple syrup

Method

Beat eggs with milk, add in sugar, cinnamon, vanilla, and a pinch of salt in a wide rectangular dish.  Soak the bread until the egg custard is absorbed on each side.

Heat a large frying pan with oil or butter on medium heat.  Add the soaked toast pieces in the pan.  Cook for about 2-3 minutes per side or until golden.  Top with the blood oranges, pomegranates, raspberries, nuts, and other topping of your choice.

I got a new camera, a dSLR.  Yes, I know it’s quite exciting.  I have been a nag (even nag would be an understatement) to my husband about this for several months.  I would intentionally show him blurry photos with my point and shoot just to show him the inadequacies with it.  So, on my birthday last month he took me to Best Buy, probably just to shut me up for a little while.  I must admit, I love my camera, but I’m back to yapping about something else now. *hehehe*

The point and shoot was the birthday gift I got from my husband over 4 years ago.  When I opened the box, I was expecting something totally fab and girly but instead it was a Canon Powershot camera.  At that point our relationship was in its early stages and still blossoming, so I was nice about and said I loved it, I mean I loved it in a way but for my birthday, not so much.  You see, I’m a girly girl.  Give me bags, shoes, accessories and I will be in love with you.  But looking back now I appreciate my husband’s gesture immensely.  At that point he was a graduate student working in a lab and he did go out of his way with the camera.  Don’t worry, no need to feel bad for him, I used that point and shoot to its full capacity *even* after drowning it in the ocean a few times and resuscitating it many times.  Needless to say, I feel a little guilty now that I am not using it much anymore.

I spent 2 weeks taking pictures with my new dSLR of random things, like a vase of flowers, or a mirror hanging in my living room, or my lunch.  Then one day, I decided to go to my fridge and make something.  What I had no idea.  One way or another I ended up making ricotta fritters and began shooting away, making myself more comfortable with all the functions on the new camera.  I’m glad I ended up make these on a whim because they were delightful and so very easy.  They tasted like mini airy doughnuts and though I can’t say I eat doughnuts often, (haven’t since childhood).  But they are a staple and my husband requested I make them again and they were delicious again-all warm and comforting.  They make you feel all warm, they way only cinnamon-y goodness can.  These have been added my frequently-made dessert list.  Just talking about them is making me want to make some now!

my husband, taste tester *and* hand model

Sweet Cinnamon and Almond Ricotta Fritters

inspired by Gale Gand

Makes about 12

Ingredients

canola oil, for frying

1 egg, beaten

2 tablespoons sugar

1/2 cup fresh ricotta cheese

1/2 teaspoon pure vanilla extract

1/2 teaspoon cinnamon powder

1/2 cup ground almonds (ground in a spice grinder is fine)

1 tablespoon unbleached all-purpose flour

1 teaspoon baking powder

small pinch fleur de sel or any fine sea salt

confectioners’ sugar, for dusting

fruit preserves, for dipping (or anything you prefer: caramel, chocolate ganache, melted white chocolate, nutella)

Method

Have a frying pan ready on medium heat and add about 1/2 inch of oil to the pan and allow the oil to heat to about 350-375 degrees.

Mix the egg with the sugar, vanilla extract, ricotta cheese, and cinnamon together using a rubber spatula until combined.

Next, add in the ground almonds, flour, and baking powder until mixed into the egg and ricotta mixture.

Take teaspoon-fulls and drop the batter into the oil and cook until golden brown on all sides, about 3-5 minutes.   Drain excess oil from the fritters and allow to dry on a rack lined with paper towels.  Serve warm with preserves (or any of the other choices specified above) and dust with confectioners’ sugar.

*you can deep-fry these in oil at 375 degrees, but I didn’t find it necessary.

I would like to wish everyone a very blessed Eid.  Eid is a time for family, friends, and celebrations and I hope all of you are fortunate enough to be close to your loved ones.  Usually, we eat meat that has been slaughtered in a ritual sacrifice.  We prepare dishes like yakhni pulao (meat stock based rice pilaf), kharay masalay ka gosht (meat cooked with whole garam masala pieces), karahi gosht (a tomato/chili based meat dish), and many more.  Unfortunately, this is not a vegetarian friendly holiday, I suppose it could be though.

However, meat is not the only focus.  Desserts are prepared in copious amounts.  Kheer (rice pudding), sewayyan (sweetened vermicelli), zarda sweetened rice) are part of the dessert spread.  Yes, we are very serious about food and prepare a feast even if it’s just for your immediate family.

One of my favorite Pakistani desserts is Shahi Tukray.  Let me tell you, it is literally heaven.  Fried bread slices soaked in a sugar syrup infused with saffron and cardamom and then dunked into a rich and creamy milk pudding, so good.  So, so good.  Usually, I don’t swoon like this for other Pakistani desserts, sure I like them, but for me, Shahi Tukray are on a completely other level.  It’s almost like you take a bite and you are so consumed in the utter deliciousness that you can’t think for a minute.  Or maybe I’m just an odd one and this is only the case for me.  Regardless, this dessert is befitting to its name, which means royal pieces or morsels.

I added a twist to the recipe here, being Autumn I thought pumpkin might work in this dish.  I added pumpkin purée to the rabri (reduced milk pudding) and the combination of pumpkin with cardamom, cinnamon, and cloves (the last two another nontraditional addition of mine) was divine.  Of course, if you want to stay true to the original leave the pumpkin out, but I really enjoyed this new combination.

Eid Mubarak and even if you don’t celebrate, find some Muslim friends and I’m sure they would be more than happy to include you in their celebrations and share the yummy food with you.

Shahi Tukray with Pumpkin

Serves 6-8

Ingredients

2 cups whole milk

1 cup half and half

1 cup canned pure pumpkin purée

2/3 cups plus 2 tablespoons sugar

3-4 whole cloves

1 teaspoon cardamom powder

5 cardamom pods

1 cinnamon stick

a nice pinch of saffron threads

1/3 cup water

1/4 cup canola oil or clarified butter, for frying (you might need slightly more oil/clarified butter, but I try to use as little as possible)

1 loaf (8-10 slices) day-old country-style white bread, crusts removed (optional) and cut into 2 pieces on the diagonal

edible silver leaf, for garnish (optional)

1/2 cup toasted and chopped mixed nuts-pistachios and almonds with skin, for garnish

fresh whipped cream, for garnish

cinnamon powder, for garnish

softened butter, for greasing the baking dish

Method

In a medium-sized saucepan on medium heat, bring the milk, half and half, cardamom powder, 2 cardamom pods, cinnamon stick, cloves, 2 tablespoons of sugar, and pumpkin to a simmer. Mix the ingredients every minute or so.

Once the milk/cream mixture comes to a simmer turn the heat to low and let the mixture thicken to the consistency of a loose pudding/custard. Keep stirring every few minutes so that the cream does not burn. This should take 35-45 minutes. Once the milk/cream mixture is done, remove the cinnamon stick, cloves, and cardamom pods.

While the milk/cream mixture is simmering, make the sugar syrup by combining the remaining sugar, water, saffron threads, and 3 cardamom pods in a small saucepan on medium-low heat. The syrup will be done once the sugar and water have dissolved into a uniform liquid after about 10 minutes. Leave the sugar syrup on low heat until the milk/cream mixture is done.

At this point preheat the oven to 400 degrees Fahrenheit and butter an 8″x8″ inch baking dish.

Once the cream mixture and sugar syrup are done, start frying the bread triangles in a fry pan on medium heat with the oil or clarified butter until all the pieces are golden brown on both sides. Lay the bread on paper towels to absorb the excess oil.

Once all the bread pieces are fried, dip each bread piece into the sugar syrup then into the milk/cream mixture so that the bread is coated well and then arrange the bread into the baking dish. I like to arrange the bread on the diagonal. Repeat this until you have used up all the fried bread.

Next, take any remaining milk/cream mixture and pour it over the bread slices in the pan and use a rubber spatula to make the top smooth.

Bake the bread slices in the oven for 15 minutes or until the top just starts to slightly turn golden.

Remove from the oven and garnish with the chopped nuts and silver leaf, if you are using it.

Serve with fresh whipped cream and a sprinkling of cinnamon, if you like. I like to eat it right from the oven but it can also be eaten at room temperature or even chilled.

*This can be made a day in advance and baked the day of serving.

I also posted this recipe on food52 here.

“You just want me to be fat and making parathas in the kitchen all day,” my mother would exclaim when my sister and I got into a little fight with her.  You see, when my sister and I were teenagers my mother would often wear the same sort of clothes we wore and we would become incredibly annoyed.  Maybe she was right in a way.  We did want her to do more baking and wear ugly sweaters like everyone else’s moms.  My mother always had a young spirit and had a young outer façade to match it.  My sister and I have since gotten over our teenage qualms and are happy to have our mom raid our closet and vice versa.

She saw making parathas and rotis as the ultimate form of subservience, the sign of an unhappy woman.  I know that it was a silly thing for her to think, regardless I developed the same sort of picture in my mind.  When I got married, my mom said to me, “there’s no need to make roti everyday.”  That was certainly not in my plan and I only attempted to make them two years after marriage.  This was because I was inspired by of all the fabulous bakers and adventurous bloggers I came into contact with.

In stark contrast to my own mother is my mother-in-law.  I only hinted at the prospect of trying to make rotis and she was back the same day with a tawa.  She made sure to buy me atta and proceed on giving me a lesson in the art of making rotis.  For indeed it is an acquired art, you can not master it at one go.  When I went back to my own home, my mother-in-law would call and ask how the roti and paratha making was going.  I would fib and say I tried and that my roti were not coming out round.  These white lies were just to make her feel better, because she felt her son was being taken care of if he was receiving fresh roti and parathas.

One day, I bit the bullet and tried.  I got over my preconceived notions and complexes related to roti and paratha making.  My first few attempts were pathetic, a real blow to my self-esteem.  I consider myself a decent cook and to fail so miserably at something so simple was embarrassing.  My roti resembled and tasted like cardboard and I hadn’t even dived into the world of parathas yet.  Thankfully, slowly but surely I got there and now I can confidently say that I can make roti and paratha.

This is not going to be a daily routine in my household though, a special biannual treat, if you will.  After all, I am still my mother’s daughter and I am glad she raised me how she did.

Aloo Parathay

Makes 4

Ingredients

for the dough:

2 1/2 cups Durum wheat flour, roti or chapati flour (I use Golden Temple)

3/4-1 1/2 cup of lukewarm water

for the filling:

1 tablespoon canola or vegetable oil

3 boiling potatoes, peeled and cubed into a medium dice

1/2 a red onion, finely chopped

1/4 cup chopped cilantro

a few leaves of mint, chopped

green chilies, chopped (as many as you like, I used 2)

1/2 teaspoon cumin seeds

1/2 teaspoon coriander seeds

pinch of ajwain (carom) seeds

red chili powder/cayenne pepper, to taste

crushed red chilies, to taste, optional

salt, to taste

canola or vegetable oil, for frying

Method

Prepare the dough by kneading the flour and water together.  Add the water a little at a time until the dough just comes together.  You may not need all of the water.  I knead by hand, but you can also do this in a food processor or stand mixer with the hook attachment.

Knead for about five minutes until the dough is firm yet elastic.  Place the dough in a bowl and dab on some water over the dough so it doesn’t form a skin and cover it with plastic wrap.  Let the dough rest for at least a few hours in the fridge or on the counter if you are using it the same day.

Once ready to make the parathas, let the dough sit at room temperature for a few hours if it was in the fridge.  The dough can be stored in the fridge for up to 3 days.

To make the potato filling boil the potatoes in some cold water in a pot on medium to medium high heat until the potatoes are fork tender and easily mashed, about 15-20 minutes.  Drain the water from the potatoes and mash them with a fork or potato masher.  While the potatoes are boiling, toast the cumin and coriander seeds in a dry fry pan on medium heat for about 5 minutes.  Transfer the spices to a mortar and pestle and coarsely grind them.

Next, add in the oil, onions, cilantro, green chilies, all the spices to the mashed potatoes and mix everything together. Set aside.

Now, you will have to roll out the dough.  Separate the dough into eight even-sized balls.  You will need two balls per one paratha.  Roll each ball out so that is is smooth with no seams.  Next, flatten out the ball with you hand so that it becomes a small circle.  Put your thumb at the center of the circle and press your fingers at the edges of the circle as to expand the circle.  Press your fingers all around and rotate the circle until it starts getting bigger.  At this point, use a rolling-pin to roll out a circle with a 6 inch diameter.  For each paratha you will need two 6 inch diameter circles.

Place 1/2 a cup of the potato filling over one 6 inch diameter circle, leaving an inch free all around.  Place the second dough circle on top and using your fingers pinch the edges shut.  Using your rolling pin, roll out the paratha until it approximately has a 10 inch diameter.

Heat your tawa, griddle, or frying pan to medium heat and place the paratha on the warm surface.  Let the paratha cook like this for a minute or two then flip it over and using a pastry brush, brush on about a tablespoon of oil on the top of the paratha.  Flip it again so that the oiled side is at the bottom.  Grease the top with another tablespoon of oil.  Once the bottom has turned golden brown, about 2-3 minutes flip it over and brown the other side.  Once both sides are golden brown remove from the heat and repeat the process until the dough is finished.

Serve with raita, achar, or green chutney.  I particularly like paratha with shami kebabs.

I did it again, I pulled another ladies luncheon type of dish on my husband.  I’m telling you all (over and over again), I miss the girly bonding.   I was never the type to solely hang with the guys, but someway, somehow this has become my existence.  Much to the contrary, I consider myself a girly girl.  Ruffles, lace, pink, and jewels all make me *swoon.* Therefore, all the talk of the Habs, cardiothoracic this and that and I am at a loss.  Cooking fuels my girly aspirations.

Many of you might be wondering why I complain.  Just to be clear, it’s all light-hearted.  I moved to a small university town after I got married and it has been an adjustment.  For the first time in my life, I don’t have someone in this city I can just call and say let’s go grab a coffee.  My husband goes to medical school here and is quite busy.  I have been hunting for jobs for a few months now and no luck.  There are very limited options here, but I am hoping I find something because we have 1 more year in this city.  Essentially, I am a housewife (until I find a job).  I never pictured myself as a housewife.  The plus side to being a housewife is that I have time to cook.  There’s good and bad in every situation.

I’m glad I have the free time to explore my culinary interests.  This is why I made this savory roasted tomato tart all from *scratch.*  I was quite proud of myself because dough rolling/preparing and I have never quite on the same page.  So you can imagine my utmost and complete anger when my husband walked in and said, “where’s the meat?”  Grrrrrrrr.  In my head it was, “I’ll tell you where the meat is!”  But, in reality it was more, “I made you a fresh and delicious meal, so stop complaining.”  When he came into the kitchen and saw my farmer’s cheese all whipped up looking smooth and silky and the garnet-red roasted tomatoes and the sprinkling of thyme, I could tell he was getting excited and eating his own words.  That’s when he started saying, “I haven’t eaten all day, when will dinner be ready.”

Once my husband started eating, he actually really enjoyed this tomato tart, maybe even more than did.  Plus, he wanted to take it for lunch the next day.  Men, they are all the same.  I like to say, “simple minds.”  They will most probably come back and say women are all the same.  Tit for tat.  My husband and I call it revenge tactics.

The tomato tart is bursting with rich concentrated tomato flavor.  It is summer on a plate, a nice and light slice with a fresh farmer’s market salad so absolute bliss on a warm, sunny day.  The farmer’s market is beginning to boom with tomatoes, lettuces, rhubarb, berries, asparagus, radishes, and fiddleheads.

For the past few weeks, the farmer’s market was kind of drab and desolate but slowly the produce selection is expanding.  It’s a Saturday tradition, albeit a new one, for my husband and I to go to the farmer’s market.  We never stayed in Kingston for the summer, during the off-season the market only had maple syrup and a few odds and ends.  I am glad it is blossoming.  I look forward to the upcoming months and creating dishes for my husband and myself and of course, anyone who wants to visit.

Oven Roasted Tomato Tart with Whipped Farmer’s Cheese

Serves 3-4

adapted from Susan Spungen’s, RECIPES: a collection for the modern cook

Ingredients

for the cheese base:

1/2 cup farmer’s cheese

1/4 cup mascarpone cheese

1 egg

1/2 teaspoon sea salt, (I used fleur de sel)

1/2 teaspoon black pepper

for the oven roasted tomatoes:

4-5 plum tomatoes, sliced in half lengthwise

3 cloves garlic, minced finely

1/2 teaspoon dried oregano

3-4 sprigs thyme

sprinkling of sea salt

a few grinds of black pepper

2-3 tablespoons extra virgin olive oil

for the crust:

1 cup flour

4 tablespoons cold unsalted butter, cut into small cubes

2 tablespoons extra virgin olive oil

1/2 teaspoon sea salt

1/2 teaspoon sugar

1/4 ice water

Set aside 1 tablespoon of capers or olives for the tart, optional

Method

Start by making the dough.  Combine all the ingredients for the dough except the ice water in a food processor and pulse until the butter and flour combine into pea-sized pieces.  Next, stream in the ice water 1 tablespoon at a time until the dough just starts to come together.  You may not have to use all the water.  Next, pour out the dough onto a floured surface and knead into a ball.  Cover with plastic wrap and refrigerate for at least 1 hour to overnight.

Preheat your oven to 300 degrees and meanwhile place the tomatoes on a baking tray with the herbs, salt, pepper, and the olive oil.  When the oven has come to temperature place the tomatoes in the oven for about 2 1/2-3 hours or until they shrivel up.

Prepare the cheese base by whipping together (using a mixer, food processor, or whisk) the cheeses, egg, salt, and pepper together.  Refrigerate until you are ready to assemble the tart.

At this point, set your oven to 400 degrees, for the baking of the tart make sure your oven rack is in the middle of your oven and not too close to the top.

When the tomatoes are done, start rolling out the tart shell.  Hit it a few times with your rolling-pin so it becomes more pliable.  Roll it out until it can fill a 9 inch tart pan with a removable bottom.  Place the tart shell into the pan once it’s the right size.  Press it into the sides, it doesn’t have to be perfect and rustic looks better.

Next, spread the cheese mixture onto the base of the tart and arrange the tomatoes over the cheese mixture.  You can add some extra thyme on top if you chose.  Also, sprinkle the capers or olives on top, if you are using them.  If you wish, you can add on some extra farmer’s cheese.  Bake the tart for 35-40 minutes or until the crust is fully cooked through.  Remove from oven and allow to cool for 10-15 minutes.

Serve warm or at room temperature with a garden salad with whatever vegetables are fresh and tasty.

WARNING:  Health nuts should close the page right now.  This is truly rich and decadent and may be your only meal for a few days ;).  (Kidding about a few days, but one day should be fine hehe).

These pancakes have been haunting me since I ate them back in October.  It is funny how you can think of a food and want it so badly but you are scared to make it.  That is because you fear it will not live up to the expectations you had of it.  I mean these Bongo Room delights changed my entire perspective on pancakes.  I was never a fan of pancakes.  I would not make them on my own.  Okay, fine if you offered me some I would not say no and probably finish my plate and then take seconds.  But, these pancakes were so decadent and the perfect combination of flavors; sweet and salty, my favorite pairing for desserts.  My husband always makes fun of me, “There you go again adding you fleur de blah blah into the dessert.”  I am not being pretentious about it, believe me, I shudder when I hear food snobs.  I simply like the roundness and that zing salt adds to sweet dishes.  The pretzels also add a great textural and salty element.  I love the CRUNCH!

Also, I did not have a pancake recipe in my repertoire so I put my faith into an Allrecipes recipe.  Now, I am officially a pancake fan with or with out the over the top white chocolate and caramel toppings!  This recipe yielded such fluffy, airy, and cloud-like pancakes that I converted without a fight.  I would eat these plain!

My next mission is to go to the Clinton Street Baking Company in Manhattan for their famous pancakes.  My sister did not speak to me for a few days after I went to Manhattan a few months ago and did not stop there.  See how passionate we are about food.  🙂

White Chocolate Caramel Pretzel Pancakes inspired by The Bongo Room (Chicago)

Serves 2

Pancake recipe from here.

Ingredients

3/4 cup milk

2 tablespoons white vinegar

1 cup all-purpose flour

2 tablespoons white sugar

1 teaspoon baking powder

1/2 teaspoon baking soda

1/2 teaspoon kosher salt

1/2 cup of crushed pretzels

1 egg

1 teaspoon pure vanilla extract

2 tablespoons butter, melted

Mix together the milk and the vinegar in a small bowl and set aside for 5-10 minutes, so that the milk sours.  Meanwhile, combine all the dry ingredients into a bowl.  After the milk has soured, pour it into the dry ingredients and also add the egg and the vanilla extract.  Whisk together all the ingredients until they form a smooth batter.  Mix in the crushed pretzels.  Heat a frying pan or griddle on medium-low heat with some butter or oil.  Take 1/4 cup fulls of the batter and cook on a frying pan or griddle until cooked on both sides, flip when the top of the pancake is covered in bubbles, about 2 minutes per side.

Serve with warm caramel sauce and white chocolate sauce and garnish with crushed pretzel pieces and confectioner’s sugar.

I used Ina Garten’s caramel sauce recipe and added 1/4 teaspoon of fleur de sel and 1 tablespoon of butter at the end.  If you can find a good quality store-made caramel sauce go ahead and use it.  For me, making caramel is daunting and not something I enjoy.  Ina’s recipe is pretty good, but a bit stressful.

For the white chocolate sauce, simply take 6 ounces of good quality white chocolate (I used Callebaut, if you can find Valrhona Ivoire that would be great as well), 1/4 cup of milk, 1 teaspoon of vanilla extract and melt over a double boiler until smooth.

I really need to get back to healthy cooking.  But who wants to read a blog post about some calorie-free dish of blah?  Not me for sure.  I “ooooh and ahhh” when something is decadent and rich.  This quiche is both of those things.  I went through a phase where I would not touch eggs, they would just gross me out.  I think it had to do with the smell of the yolk, something I still have not come to terms with.  Now, I like omelets, quiches, and the like but will not touch a runny yolked egg.  I know, I know, culinary faux pas on my part, but let me have one.  Otherwise, I am not picky at all.

The story of this quiche comes from my grocery trip last week.  I picked up leeks with no inkling of what I would make out of them; a soup was the most obvious thing that came to my mind.  But then again, I thought, “Boring!”  So I sifted through my cookbooks hoping to find the perfect leek tart recipe.  Not much luck.  Booooo.  Then I went to Google and typed Leek and Mushroom Tart and I was led to Deb (whose site I love) from Smitten Kitchen’s recipe for Leek and Mushroom Quiche and alas I had some inspiration.  I used her recipe as a starting point and wanted to add my own flair to it clean out my fridge.

I used a mish mash of cheeses, sour cream, light cream, herbs and the outcome was good!  My husband rolled his eyes at me when I said I am making a Leek and Mushroom quiche for dinner, probably because he knew he was going to have be vegetarian tonight.

*Oh!  Don’t worry about the dough, if I can do it you CAN do it too.  Plus, I don’t even have a rolling pin and used a glass to roll out the dough.  (I know, I can spend on other things but I’m stingy when it comes to a rolling pin, only God knows why, :))  It was simple to make, probably because I have a food processor, if not the story would probably be a rant furthering my hate for dough making.  Fortunately, I succeeded!  But, if it’s easier for you do get a pre-made pie crust or use puff pastry.

Empty out the Fridge Quiche

Inspired and Adapted from Smitten Kitchen’s Leek and Mushroom Quiche

Tart Crust from Martha Stewart and Baking Technique from Joy of Baking (Makes 2 crusts, so halve the recipe or save the other crust for later)

Serves 4-6

Ingredients

1 tart crust rolled out in a 9 inch pan and pre half-baked

2 cups chopped leeks, rinsed thoroughly

1 1/2 cups sliced mushrooms, I used half shiitake and half baby bella

2 tablespoons olive oil

3 cloves garlic, chopped

4 sprigs of thyme

1 teaspoon salt, or to taste

1 teaspoon black pepper, or to taste

3 large eggs

1/3 cup low-fat sour cream

1/4 light cream or milk

1 cup grated cheese of your choice, I used a mixture goat cheese, fresh mozzarella, and manchego

1/2 chopped baby spinach

1/2 cup chopped baby arugula

1/4 cup chopped parlsey

12 sprigs of chives, chopped

Method

Caramelize the leeks and mushrooms with salt, black pepper, and thyme in the olive oil on medium low heat for about 20 minutes and allow to cool slightly, discard the thyme stems.  Preheat the oven to 400 degrees.  In a medium sized bowl crack the eggs and whisk.   Add the sour cream, light cream, cheeses, baby spinach, baby arugula, parsley, and chives.  Next, add the cooled leeks and mushrooms.  Add extra salt and black pepper if necessary.  Pour the egg mixture into the pre half-baked tart crust.  Bake for 45 minutes.  Allow to cool slightly, do not serve it right out of the oven, it tastes better warm.  I served it with a mixed green salad like on Smitten Kitchen, and with a dijon vinaigrette.