Archives for category: Brunch

Processed with VSCOcam with f2 preset

This winter has been rough on me, and I’m sure it’s been tough for a lot of you too.  I check the weather on my phone and see no hope for days.  Temperatures lingering well below freezing seem to be the norm now.  Of course, there are snippets of beauty amongst this snow and ice.  Scenes that would rival any tropical paradise in their splendor.

IMG_5166

On the positive side, I do love me some winter fashion.  I love chunky knits, boots, pom-pom hats, and huge scarves wrapped around a thousand times. I’ve gotten to wear crimson and berry-toned lip colors, which look out-of-place in the warmer months.  I have also been loving  goth-inspired nail polishes – very moody and a far cry from the fuchsias and tangerine reds I wear in the summer.

Processed with VSCOcam with f2 preset

There have also been cozy times I get to share with my husband.  Him and I exploring the city and finding a new café.  I will get a latte and he will get a hot chocolate because he has an abhorrence that stems from childhood towards coffee.  We’ll share a cookie or a croissant or both and discuss things in the world that we don’t understand or can’t wrap our heads around, future vacations we want to take, or whatever may come up.

We’ll also laze around at home more often on the weekends.  In the summer I like to be out and about.  This winter I’m enjoying staying in more. Usually I’m the type of person who gets in a very bad mood if we don’t have weekend plans.  But this winter I’ve been happy to stay-in on a Friday night and cook a nice dinner for just the two of us.  Of course friends are always welcome, but rather than going out, sometimes it’s nice to stay snug and comfortable at home.  When Sunday morning comes around I’m also skipping the usual restaurant brunches and opting for an omelet or pancakes or French toast at home.  I’m not big on sweets for breakfast, but sometimes a nice french toast satisfies like nothing else.

Processed with VSCOcam with f2 preset

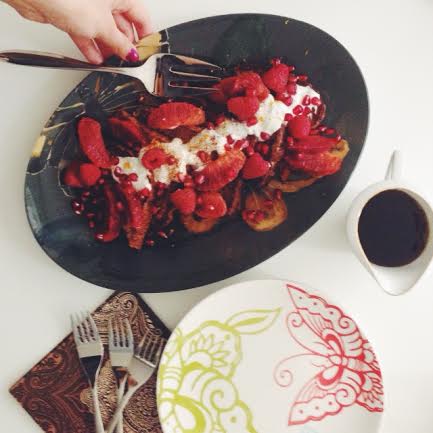
When making French toast I don’t really measure anything out.  It’s an effortless dish that will come together if you have the basic ingredients.  That’s why I love making it.  I paired it here with ruby-toned fruits: blood oranges, pomegranates, and raspberries.  And I always use cinnamon and vanilla in my french toast.  You can add other spices like cardamom or ground cloves.  But the combination of cinnamon and vanilla is my favorite and will make your whole kitchen smell very welcoming.

Processed with VSCOcam with f1 preset

Cinnamon and Vanilla French Toast with Ruby Colored Fruits

I am providing a loose recipe here, because I really feel French toast is foolproof unless you burn it in the pan. 😉

Ingredients

oil or butter for frying

bread of your choice, sliced a little thicker than usual and day old is best.  I usually have whole wheat or sunflower toast, but brioche and challah are optimal.

eggs, use 1 egg for every 3 slices of toast

milk of your choice, use about 1 cup for every 3 slices of toast

sugar, to taste – I like to use raw sugar or sugar with larger crystals so that it caramelizes nicely on the toast.

vanilla extract or a vanilla bean scraped, start with 1 teaspoon of vanilla extract

ground cinnamon, 1/2 teaspoon for 3 slices of toast, you can  adjust the amount according to your taste

a pinch of sea salt

an array of fruits or your choice, I used blood oranges, pomegranates, and raspberries. (fruit combination inspired by @thedelicious on instagram)

chopped nuts, for serving (optional)

to serve: whipped cream or sour cream or crème fraîche or yogurt, orange zest, cinnamon, and pure maple syrup

Method

Beat eggs with milk, add in sugar, cinnamon, vanilla, and a pinch of salt in a wide rectangular dish.  Soak the bread until the egg custard is absorbed on each side.

Heat a large frying pan with oil or butter on medium heat.  Add the soaked toast pieces in the pan.  Cook for about 2-3 minutes per side or until golden.  Top with the blood oranges, pomegranates, raspberries, nuts, and other topping of your choice.

I’ve totally lost touch with my blog.  I’ve been trying to write a post for ages, but something was stopping me.  I have no idea what it was, but I put my foot down finally and decided I really want to resume my posts.  They are fun for me and I love the interaction with all of you!  I’m not one for New Year’s resolutions, but my resolution this year is to get back into blogging and stop making excuses about why I’m not, because there’s no valid reason except my own laziness.  I’m so silly, I will buy things thinking I’ll use them for my blog and they sit untouched.  I’m sure some of you with blogs know what I’m talking about.

I didn’t really fall off the wagon from cooking, but I haven’t been as enthusiastic about it as I used to be.  It’s slowly coming back and I’m ready to start up again.  Maybe it’s the winter – winter blues, I guess.  I know there’s lots to cook during the winter, but until recently I was totally uninspired.  Summer produce and colors inspire me.  This is probably also probably why I’ve been thinking once my husband is done residency we NEED to move somewhere warm.  It’s been on my mind for a few weeks now.  I’m craving sun and warmth.

Despite my love for summer, I do have a few winter produce favorites.  Most notable are beets.  I almost always have them on-hand.  Must have something to do with the color, I suspect.  As I’ve said before I’m a sucker for vibrant colors.  To the same effect, I buy watermelon radishes ALL THE TIME, not because I love thetaste, but more that I love the way they look.  For this dish there were no watermelon radishes, unfortunately.  But this tart is good with whatever you have on hand: mushrooms, spinach, caramelized onions – you name it.  I used to be daunted by making dough, but now I’ve formulated my own proportions and it works every time like a charm.  This sort of tart is one of my go-to dishes.  Although it does take some time, it is by no means difficult to make.

Roasted Beet and Carrot Tart

Serves 4-5

Ingredients

for the crust:

3/4 cup all-purpose flour

1/2 cup walnuts

1/2 teaspoon sugar

1/2 teaspoon salt

6 tablespoons butter, frozen

up to 1/4 cup ice water

filling:

6 ounces goat cheese, softened

1/2 cup ricotta cheese

1 egg

1/2 teaspoon herbes de Provence

salt and black pepper, to taste

for top:

2 golden beets

2 carrots

1/4 cup chopped parsley and chives, or any herbs of your choice, for garnish

Method

Roast the beets in the oven (at 350 degrees) in a foil pouch on a baking tray drizzled with some olive oil, salt, and pepper for 45 minutes or until cooked.  At the 30 minute mark add in the  whole carrots, also tossed with olive oil, salt, and pepper.  Once cooked, slice the beets and carrots into thin slices.

To make the tart dough: in a food processor, add the walnuts and pulse until they turn into a fine grind, add in the flour, sugar, and salt and pulse until combined.  Grate the frozen butter and add it to the flour.  Pulse until the mixture forms pea-sized clumps.  Next, through the top, stream in the ice water, one tablespoon at a time until the dough forms a ball.  Once the dough comes together, cover it in plastic wrap and refridgerate for at least an hour.  After the dough has chilled, roll it out and fit it into a 9-inch tart pan with a removable bottom and blind bake (cover it with foil and use pie weights or dried beans to weigh down the crust, so that it doesn’t puff up while baking) it in a 400 degree oven for 15 minutes.

For the filling: whisk the goat cheese, ricotta, and egg together.  Add in the salt, pepper, and herbes de Provence.  Pour it into the partially baked crust and bake for 15 minutes at 400 degrees.  After 15 minutes, take it out of the oven and arrange the cut beets and carrots over the goat cheese and ricotta and bake for another 10-15 minutes.  Garnish the tart with chopped parsley and chives, or any herb of your choice.  You can also sprinkle the final product with some flaky sea salt and drizzle with olive oil, if you like.  Serve warm or at room temperature.

I often go through the dilemma as to whether I’m a city girl or a country girl.  I grew up in the country and always wanted to live in the city.  Now that I’m living in a city I love it.  I’m busy there’s way more to do and I think I see myself as someone who always needs to live near a big city.  But I do appreciate the beauty and peace the country has to offer.  Ultimately, I need to be close enough to a rural area that if I get the urge to unwind the option is there.

I had been urging my husband to go apple picking with me for years now.  I remember there was a farm very close to my house that I used to go to as a child.  We would all sit on the back of a large tractor and go off into the orchard picking apples and pumpkins and coming back to the farm to drink warm apple cider and munch on freshly baked pies.  Just thinking about it is making me all warm inside.  It was those simple things I enjoyed, I see some children now who would think such an outing would be lame.  In this day and age everything has changed and it makes me feel old.  Taking a drive 45 minutes out of the city brings back so many memories and sort of gives you a reality check.  We let go of our selfishness and just enjoy nature.

My husband eats up country living, he would have been content to stay in the country-ish city we were in before.  He says it’s because he grew up in the desert (the Middle East) so everything there was man-made and new.  No greenery, no trees, just sand and more sand.  We’ve come to the compromise that once we settle wherever we will end up permanently has to be within 45 minutes of the countryside.  I think I can handle that.  After all, I am a country girl at heart.

Back to the apple picking, I have with so many apples I don’t know what to do with them.  We got a little over zealous and picked way too many.  I started off by making this caramel apple cake.  Though it was delicious it only used up about 5 apples.  If I make about 10 more, I might be able to use up all the apples.  This cake is actually worth making 10 more times.  It’s easy and the apple flavor really shines through.  I added crushed nuts on top, which not only added extra flavor, but also made the cake look even prettier.  It’s a rustic cake, it sort of reminds me of a clafoutis – very light and airy.  Give it a go and make it with apples you’ve picked yourself.

Salted Caramel Apple Cake

*The consistency of reminds me of Dorie Greenspan’s Apple Cake.

Ingredients

1 cup Salted Caramel*

3 cups chopped apples, preferably baking apples, I used Spartan and Cortland

1 teaspoon ground cinnamon

squeeze of lemon juice

6 tablespoons unsalted butter, at room temperature

3/4 cup sugar

2 eggs

2 tablespoons sour cream or yogurt

1/2 cup milk

2 teaspoons vanilla extract

1 1/2 cups all-purpose flour

1 teaspoon baking powder

1/2 teaspoon baking soda

1/2 teaspoon salt

crushed nuts (any that you like – pistachios, almonds, walnuts, pecans), for garnish

confectioners’ sugar, for garnish

Method

Preheat your oven to 350 degrees and butter and flour the bottom of a 9 inch springform pan and line the bottom with parchment paper.

Sift together the flour, baking powder, baking soda, and salt, set aside.

Mix together chopped apples, cinnamon, and lemon in a bowl.  Next, combine with the caramel and set aside.

In a bowl of a stand mixer with the paddle attachment on, beat the butter and sugar together on medium speed for 3-4 minutes or until light an airy.  At this point, add in the eggs, one at a time and beat until combined.  Add in the sour cream, milk, and vanilla.

Next, with the mixer on low-speed, slowly incorporate the flour mixture into the batter and beat until just combined.

Lay the apple and caramel mixture on the bottom of the springform pan and then lay the batter on top of the apples.  Spread the batter evenly on top.  Place the springform pan on a cookie sheet and bake in the oven for 40-50 minutes, or until a toothpick comes out clean.  When done, remove the cake from the oven and let it sit at for 30 minutes before removing the springform pan.  Invert the cake on the serving dish so that the apples are on top and then garnish with the chopped nuts and confectioners’ sugar.

*for the caramel I use this recipe and replaced the kosher salt with fleur de sel.


I’m an odd one who likes to have a sandwich for breakfast.  I’ll pass up eggs, cereal, french toast, pancakes, waffles for a sandwich.  Though I like all of those things, I prefer this sandwich.  When I visit my parents, I’m always sure to get some jalapeño chicken sausage and make a sandwich out of it for breakfast.  Unfortunately, I can’t find any pork-free chicken sausage here, though I’m sure they exist, so I opt for this vegetarian version.

With or without chicken sausage I am a lover of cheese, bread with almost any other combination.  I like to add basil, chives, and/or cilantro as well.  My sister and I came up with this (genius ;)) combination for breakfast.  We’re big on sandwiches and are known to turn meals into a sandwich.  All you really need is bread.

Spicy chilies and flavors are also a favorite of mine.  Hence, the radishes and jalapeños .  I think everything melds so nicely here: spicy, creamy, and fresh.  The textures all work, too.  Not too shabby if I say so myself.  I have created the perfect form of food in a sandwich.  Yes, I’m being totally sarcastic and I’m sure someone reading this will turn their nose up at this and think, “what is she going on about???”  Regardless, this is my favorite breakfast, lunch, and/or dinner for when I’m not in the mood for something that takes effort to make and after eating this sandwich I’m truly satisfied.

My Favorite Sandwich

There are absolutely no directions on how to make this sandwich.  I’ll give you some rough ideas and you go ahead and make your perfect sandwich.

Ingredients

nice hearty bread (I used honey, nut, flax)

radishes

avocados

good quality tomatoes, like heirloom

cucumbers

jalapeño peppers (fresh or pickled)

cheese of your choice (I used a semi-soft sheep’s milk cheese.)

lime juice

herbs: basil, chives, cilantro, dried herbs de Provence

sea salt

extra-virgin olive oil

Method

Toast bread drizzle on olive oil and dress with toppings of your choice.  I make them open-faced.   Easy!

I haven’t baked in ages.  I can also say it’s been a long time since I’ve cooked anything special.  As I mentioned before, we’re moving, things are starting to be packed up and the kitchen is about to be boxed up.  I want to post more frequently on my blog. After all, I squealed and acted like an annoying brat until I got my new dSLR back in November for my birthday.  I haven’t used it as much as I would have liked.  Hopefully, with the warmer weather coming up, I will spend more time with the camera.  I’m looking forward to the summer months where produce will be abundant and I will have forgotten how long this year’s winter was.  In all honesty, it’s still winter here.  It’s only a few degrees above freezing today, not exactly what you expect on April 18th!

Where are the tulips and daffodils?  My husband and I drove back from Toronto to Kingston last Friday, all the trees were barren-gray and more gray.  The buds were not even visible yet.  Is it December or April?  To make myself feel better, I baked.  Baking is a therapeutic process for me.  My usual neat freak self takes a little break and I make a mess in the kitchen (only with baking).  I did my thing, and in the process took pictures.  I felt like I was back into the swing of things.

The cake tastes bright and fresh.  It’s all lemony and cheery.  I wanted it to be a swirl cake, but I learned that brown sugar just blends in.  No swirls.  That’s alright though, it tasted good.  Super moist and not too sweet.  Perfect with a cup of tea or coffee, but the child in me loves milk with cake.  I also made a lemon zest sugar that I incorporated into the cake with cream cheese. It was divine.  I had to stop myself from eating it as is.  In the process, I also learned it could work as a great skin scrub (before the addition of cream cheese), food and beauty all in one. Yay.

In these 2 weeks before we move out, I hope I’ll manage to do some more cooking and photographing.  Until then, this cake serves as a good start.

Lemon Brown Sugar Cake

Makes 1 loaf

Ingredients

1/2 cup sugar+ 2 tablespoons

1/2 cup brown sugar

zest of 2 lemons

4 ounces cream cheese, softened

4 tablespoons butter, softened

1/4 cup canola oil

2 large eggs, at room temperature

1/4 cup greek yogurt

1/4 cup freshly squeezed lemon juice

2 teaspoons vanilla extract

1 1/2 cup cake and pastry flour, sifted

1 teaspoon salt

1 teaspoon baking powder

Method

Preheat the oven to 350 degrees.

Grease a 9″ by 5″ by 3″ loaf pan and line it with parchment paper.

In a food processor, add the lemon zest, 1/4 cup of brown sugar, and 2 tablespoons of the regular sugar and pulse until combined.  Once combined, add in the cream cheese and vanilla extract and run the food processor until the mixture is smooth, set aside.

Using a stand mixer or hand mixer (and bowl) cream together the butter, oil, and sugar and 1/4 cup of  the brown sugar, until light and fluffy.  Next, beat in the eggs until combined, and then, add in the greek yogurt.  Beat for a minute and then pour in the lemon juice and the remaining 1 teaspoon of  vanilla extract.

Sift together the flour, salt, and baking powder in another bowl and gradually beat it into the egg and butter mixture.  Once the flour is incorporated, swirl in tablespoonfuls of the cream cheese, lemon zest mixture into the batter.  Once the cream cheese mixture is incorporated pour the batter into the prepared loaf pan and bake for 1 hour.  Once cooked, allow to cool for 30 minutes and serve with a dusting of confectioners’ sugar.

I got a new camera, a dSLR.  Yes, I know it’s quite exciting.  I have been a nag (even nag would be an understatement) to my husband about this for several months.  I would intentionally show him blurry photos with my point and shoot just to show him the inadequacies with it.  So, on my birthday last month he took me to Best Buy, probably just to shut me up for a little while.  I must admit, I love my camera, but I’m back to yapping about something else now. *hehehe*

The point and shoot was the birthday gift I got from my husband over 4 years ago.  When I opened the box, I was expecting something totally fab and girly but instead it was a Canon Powershot camera.  At that point our relationship was in its early stages and still blossoming, so I was nice about and said I loved it, I mean I loved it in a way but for my birthday, not so much.  You see, I’m a girly girl.  Give me bags, shoes, accessories and I will be in love with you.  But looking back now I appreciate my husband’s gesture immensely.  At that point he was a graduate student working in a lab and he did go out of his way with the camera.  Don’t worry, no need to feel bad for him, I used that point and shoot to its full capacity *even* after drowning it in the ocean a few times and resuscitating it many times.  Needless to say, I feel a little guilty now that I am not using it much anymore.

I spent 2 weeks taking pictures with my new dSLR of random things, like a vase of flowers, or a mirror hanging in my living room, or my lunch.  Then one day, I decided to go to my fridge and make something.  What I had no idea.  One way or another I ended up making ricotta fritters and began shooting away, making myself more comfortable with all the functions on the new camera.  I’m glad I ended up make these on a whim because they were delightful and so very easy.  They tasted like mini airy doughnuts and though I can’t say I eat doughnuts often, (haven’t since childhood).  But they are a staple and my husband requested I make them again and they were delicious again-all warm and comforting.  They make you feel all warm, they way only cinnamon-y goodness can.  These have been added my frequently-made dessert list.  Just talking about them is making me want to make some now!

my husband, taste tester *and* hand model

Sweet Cinnamon and Almond Ricotta Fritters

inspired by Gale Gand

Makes about 12

Ingredients

canola oil, for frying

1 egg, beaten

2 tablespoons sugar

1/2 cup fresh ricotta cheese

1/2 teaspoon pure vanilla extract

1/2 teaspoon cinnamon powder

1/2 cup ground almonds (ground in a spice grinder is fine)

1 tablespoon unbleached all-purpose flour

1 teaspoon baking powder

small pinch fleur de sel or any fine sea salt

confectioners’ sugar, for dusting

fruit preserves, for dipping (or anything you prefer: caramel, chocolate ganache, melted white chocolate, nutella)

Method

Have a frying pan ready on medium heat and add about 1/2 inch of oil to the pan and allow the oil to heat to about 350-375 degrees.

Mix the egg with the sugar, vanilla extract, ricotta cheese, and cinnamon together using a rubber spatula until combined.

Next, add in the ground almonds, flour, and baking powder until mixed into the egg and ricotta mixture.

Take teaspoon-fulls and drop the batter into the oil and cook until golden brown on all sides, about 3-5 minutes.   Drain excess oil from the fritters and allow to dry on a rack lined with paper towels.  Serve warm with preserves (or any of the other choices specified above) and dust with confectioners’ sugar.

*you can deep-fry these in oil at 375 degrees, but I didn’t find it necessary.

Growing up, my family was all about food.  My parents would drive us 3 hours to New York City to eat “real” Pakistani food.  On the weekend, we were travelers in search for the next delicious meal.  My sister and I would be ever so excited to explore new places and see the hustle and bustle of different cities.  Our eyes were always wide-open, ready for these experiences.  Whether, we went to Newport for fresh, straight from the ocean seafood, or to a little hole in the wall Mexican restaurant that we still frequent to this day, we were set to feast.  We learned about other cultures this way, too.  What better way for parents to expose their children to different cultures than through their food.  Food welcomes you into a new culture.  The tastes of the cuisine transports you to a new place, somewhere less familiar than what we are used to, but at the same time we are ready to embrace the novelty.

Tucked away in the back seat, my sister and I would peer out of the  windows with utter enthusiasm waiting for a new exploration.  If you remember, we were the two sisters who played in the woods and pretended we were pioneers, Indians, French, you name it-we pretended it (the joys of childhood!).  These excursions took our make-believe world into reality.

I have very fond memories of attending the Greek Orthodox festival in Rhode Island.  As many of you are probably aware, Greeks (like most of us) are completely immersed in their cuisine and take great pride in hospitality and serving their traditional dishes to others.  There was food galore.  Souvlakis would be sizzling on hot coals, my sister and I would stare in awe at the roast lamb spinning on a spit with the juices dripping down and coating the lamb with deliciousness, and flaky phyllo pastries such as baklava and spanakopita.  This festival was overflowing with sensory delight.  We would also watch the Greek dancers in amazement.  My sister and I would “choreograph” Bollywood dance skits at home, so the Greek dances piqued our interest as well.

We would walk around just take it all in and we loved every minute of it.  Our main purpose was eating, of course.  Our favorite thing to indulge in were the spanakopitas.  To this day I love them, no matter how introductory they are to greek cuisine.  The flaky and paper-thin phyllo layers were (and still are) so fun to break off layer by layer and in the middle you would meet the spinach filling full of feta, parley, and olive oil.  This is one way to get your kids to eat spinach.  I make spanakopita from time to time and each time I do I am reminded of the Greek Orthodox festival and every time I think it would be so nice to go again.

Spanakopita with Kalamata Olives and Pine Nuts

Serves 8

Ingredients

1/3 cup plus 2 tablespoons extra-virgin olive oil

crushed red chili flakes, to taste

2 shallots, chopped

2 garlic cloves, minced

12 ounces spinach leaves, stems removed and chopped

4 scallions, sliced

2 tablespoons chopped dill

2 tablespoons chopped parsley

1 tablespoon chopped mint

2 tablespoons fresh lemon juice

pinch of freshly ground nutmeg

1/2 cup crumbled feta cheese

1/4-1/2 cup grated kefalotyri cheese

1 tablespoon sour cream

2 eggs, beaten

1/3 cup kalamata olives, chopped

2 tablespoons roasted pine nuts

salt and black pepper, to taste

16 ounce package of phyllo dough, if frozen defrosted overnight in the refrigerator

Method

Preheat the oven to 400 degrees.

In a sauté pan on medium heat, add 2 tablespoons of olive oil and the shallots.  Allow the shallots to cook for 2-3 minutes or until they become to soften and add in the garlic and red chili flakes.  Once the garlic perfumes the oil, add in the chopped spinach.  Let the spinach wilt and cook down.  Add some salt, black pepper, and the pinch of nutmeg.  Once the spinach is all cooked, set it aside and allow it to cool slightly.  In the meantime, grease a 9″ by 13″ baking dish.

Once the spinach has cooled, add in the remaining ingredients (except the phyllo and remaining olive oil), there is no rhyme of reason to the order.  Mix to combine all the ingredients, make sure they are well incorporated.

Next, take the phyllo dough (make sure to cover it with a damp kitchen towel so that it doesn’t dry out) and cut the sheets so that they would fit into the baking dish.  I had to simply cut the sheets in half.  Once the sheets are the right size, divide the phyllo into two equal stacks.  One stack will be for the bottom layer, one will be for the top layer.

Take the phyllo dough two sheets at a time and layer into the baking dish.  Every second sheet should be brushes generously with olive oil.  Once the first stack of phyllo is finished layer all of the spinach mixture over the phyllo.  Then, repeat the process so that the spinach is covered and in the middle of the two stacks of phyllo dough.  Make sure the phyllo layers are well oiled so that they become crispier.

Bake the spanakopita in the oven for 45-50 minutes, or until the phyllo is golden brown.  Once slightly cooled, cut into squares or diamonds.  Serve warm or at room temperature.

A signature trait of mine is that I can be quite sensitive.  I see a restaurant going out of business, I ponder and wonder why people didn’t like it.  I cannot tolerate people being mean to waitstaff or a salesperson.  Someone beeps their horn at me while driving, I can’t sleep at night thinking about it.  I see a person eating alone at a restaurant, I wonder if they are okay and if they have any friends.  I see devastating news on the television and I am in tears.

I mentioned restaurants going out of business first because that is something that really bothers me.  I know some restaurants just serve bad food and are mismanaged.  But, I think of the planning and the blood, sweat, and tears that people put into such endeavors.  It really breaks my heart.  My sister is the same way, one time she started crying when she saw a big grand opening sign for a new restaurant and no one inside with the waiters ready to serve.  She said, “They have all the food ready and are waiting for people to eat it.”  Even typing that sentence makes my heart sink.

Where I live now, I have seen the closing of several restaurants and bakeries.  New places just don’t do too well here.  There aren’t many options in terms of dessert.  This saddens me because I love going out for dessert.  When I lived in Montreal there was a patisserie at every corner and back home in Rhode Island, Pastiche is a local institution.

Baking is not my speciality.  I do enjoy it, but when I bake, my usually organized, neat, and tidy self goes out the window.  Flour splattered all over the counter, 100 random mixing bowls, eggshells, and sugar are in a disarray all over my kitchen.  This is why I wish, I could go and pick up something from a dessert shop and call it a day.  It would save my kitchen from a tornado of baking supplies.

I made this summer berry upside down cake firstly, because I went crazy buying berries last weekend at the farmer’s market and secondly, I didn’t have the ingredients to make cheesecake for my husband.  ***Husband spoiler alert:  I am saving the cheesecake his birthday next month.***

I was also unsure how this cake would turn out because I was combining two recipes together.  Also, another baking phobia of mine is that my dessert will come out tasting too eggy.  I am one of those people who can’t stand the smell or taste of egg yolks.  I am sure the “real” foodies will now outcast me.  But to my defense, who wants an egg-yolky tasting dessert anyway?  The upside-down aspect of the cake also had me on the edge.  I was convinced this was going to be a disaster comprised of me using a knife to scrape off the berries from the bottom of the pan.  Thankfully, none of this was the case and the cake was delightful, not overly sweet and just the right hint of berry goodness.  Plus, the berry colors are my absolute favorite.

Sorry, if I depressed any of you with the ramble about my sensitive nature.  At least, I ended with cake.

Summer Berry Upside-Down Cake

Serves 6-8

adapted from Martha Stewart’s Plum and Raspberry Upside-Down Cake and Ina Garten’s Honey Vanilla Pound Cake

Ingredients

5 tablespoons unsalted butter, at room temperature (2 tablespoons for the pan)

4 tablespoons canola oil

1/4 cup light brown sugar

2 pints raspberries*

1 pint blackberries*

1 1/2 cups cake and pastry flour

1/2 teaspoon ground cinnamon

a pinch of nutmeg

3/4 teaspoon baking powder

1/4 teaspoon baking soda

1 teaspoon kosher salt

3/4 cup organic cane sugar

2 eggs, at room temperature

2 tablespoons honey

2 teaspoons pure vanilla extract

1/2 cup plain yogurt

*use any fruits you like and are in season

Method

Preheat your oven to 375 degrees.  Spread 1/2 tablespoon of butter over the bottom of a springform pan (8 1/2″ by 2 1/2″).  Line the bottom of the pan with parchment paper spread the remaining 1 1/2 tablespoons of butter over the parchment paper.  In a bowl, mix the berries with the brown sugar.  Arrange the berries on the bottom of the pan, I clustered the blackberries in the middle and surrounded them with the raspberries.  Set aside.

Next, in a bowl, sift together the flour, cinnamon, nutmeg, baking soda, baking powder, salt.

Using an electric mixer with the paddle attachment, cream together the remaining butter, canola oil, and sugar for about 3 minutes.  Combine the eggs, honey, and vanilla in a bowl and drop one egg at a time into the butter, oil, and sugar mixture on medium speed.  Mix until combined and add in the yogurt and mix until incorporated.

Turn your mixer to low speed and gradually pour in the flour until it is combined.  Do not overmix.

Pour the batter evenly over the berries.  Bake for 1 hour, but at the 40 minute mark turn the oven down to 325.  After 1 hour, make sure the cake is done by inserting a knife and making sure it comes out clean.  Allow to cool.  Using a knife, go around the edges of the cake to make sure it does not stick to the pan.  Unlock the springform pan and invert it over your serving dish, so that the berries are on top (remove the parchment paper).  Dust with powdered sugar and serve with fresh vanilla whipped cream.

Pear Upside Down Cake on Foodista
Pear Upside Down Cake on FoodistaPear Upside Down Cake

I did it again, I pulled another ladies luncheon type of dish on my husband.  I’m telling you all (over and over again), I miss the girly bonding.   I was never the type to solely hang with the guys, but someway, somehow this has become my existence.  Much to the contrary, I consider myself a girly girl.  Ruffles, lace, pink, and jewels all make me *swoon.* Therefore, all the talk of the Habs, cardiothoracic this and that and I am at a loss.  Cooking fuels my girly aspirations.

Many of you might be wondering why I complain.  Just to be clear, it’s all light-hearted.  I moved to a small university town after I got married and it has been an adjustment.  For the first time in my life, I don’t have someone in this city I can just call and say let’s go grab a coffee.  My husband goes to medical school here and is quite busy.  I have been hunting for jobs for a few months now and no luck.  There are very limited options here, but I am hoping I find something because we have 1 more year in this city.  Essentially, I am a housewife (until I find a job).  I never pictured myself as a housewife.  The plus side to being a housewife is that I have time to cook.  There’s good and bad in every situation.

I’m glad I have the free time to explore my culinary interests.  This is why I made this savory roasted tomato tart all from *scratch.*  I was quite proud of myself because dough rolling/preparing and I have never quite on the same page.  So you can imagine my utmost and complete anger when my husband walked in and said, “where’s the meat?”  Grrrrrrrr.  In my head it was, “I’ll tell you where the meat is!”  But, in reality it was more, “I made you a fresh and delicious meal, so stop complaining.”  When he came into the kitchen and saw my farmer’s cheese all whipped up looking smooth and silky and the garnet-red roasted tomatoes and the sprinkling of thyme, I could tell he was getting excited and eating his own words.  That’s when he started saying, “I haven’t eaten all day, when will dinner be ready.”

Once my husband started eating, he actually really enjoyed this tomato tart, maybe even more than did.  Plus, he wanted to take it for lunch the next day.  Men, they are all the same.  I like to say, “simple minds.”  They will most probably come back and say women are all the same.  Tit for tat.  My husband and I call it revenge tactics.

The tomato tart is bursting with rich concentrated tomato flavor.  It is summer on a plate, a nice and light slice with a fresh farmer’s market salad so absolute bliss on a warm, sunny day.  The farmer’s market is beginning to boom with tomatoes, lettuces, rhubarb, berries, asparagus, radishes, and fiddleheads.

For the past few weeks, the farmer’s market was kind of drab and desolate but slowly the produce selection is expanding.  It’s a Saturday tradition, albeit a new one, for my husband and I to go to the farmer’s market.  We never stayed in Kingston for the summer, during the off-season the market only had maple syrup and a few odds and ends.  I am glad it is blossoming.  I look forward to the upcoming months and creating dishes for my husband and myself and of course, anyone who wants to visit.

Oven Roasted Tomato Tart with Whipped Farmer’s Cheese

Serves 3-4

adapted from Susan Spungen’s, RECIPES: a collection for the modern cook

Ingredients

for the cheese base:

1/2 cup farmer’s cheese

1/4 cup mascarpone cheese

1 egg

1/2 teaspoon sea salt, (I used fleur de sel)

1/2 teaspoon black pepper

for the oven roasted tomatoes:

4-5 plum tomatoes, sliced in half lengthwise

3 cloves garlic, minced finely

1/2 teaspoon dried oregano

3-4 sprigs thyme

sprinkling of sea salt

a few grinds of black pepper

2-3 tablespoons extra virgin olive oil

for the crust:

1 cup flour

4 tablespoons cold unsalted butter, cut into small cubes

2 tablespoons extra virgin olive oil

1/2 teaspoon sea salt

1/2 teaspoon sugar

1/4 ice water

Set aside 1 tablespoon of capers or olives for the tart, optional

Method

Start by making the dough.  Combine all the ingredients for the dough except the ice water in a food processor and pulse until the butter and flour combine into pea-sized pieces.  Next, stream in the ice water 1 tablespoon at a time until the dough just starts to come together.  You may not have to use all the water.  Next, pour out the dough onto a floured surface and knead into a ball.  Cover with plastic wrap and refrigerate for at least 1 hour to overnight.

Preheat your oven to 300 degrees and meanwhile place the tomatoes on a baking tray with the herbs, salt, pepper, and the olive oil.  When the oven has come to temperature place the tomatoes in the oven for about 2 1/2-3 hours or until they shrivel up.

Prepare the cheese base by whipping together (using a mixer, food processor, or whisk) the cheeses, egg, salt, and pepper together.  Refrigerate until you are ready to assemble the tart.

At this point, set your oven to 400 degrees, for the baking of the tart make sure your oven rack is in the middle of your oven and not too close to the top.

When the tomatoes are done, start rolling out the tart shell.  Hit it a few times with your rolling-pin so it becomes more pliable.  Roll it out until it can fill a 9 inch tart pan with a removable bottom.  Place the tart shell into the pan once it’s the right size.  Press it into the sides, it doesn’t have to be perfect and rustic looks better.

Next, spread the cheese mixture onto the base of the tart and arrange the tomatoes over the cheese mixture.  You can add some extra thyme on top if you chose.  Also, sprinkle the capers or olives on top, if you are using them.  If you wish, you can add on some extra farmer’s cheese.  Bake the tart for 35-40 minutes or until the crust is fully cooked through.  Remove from oven and allow to cool for 10-15 minutes.

Serve warm or at room temperature with a garden salad with whatever vegetables are fresh and tasty.

I used to hate smoked salmon.  I would not even touch it.  Oh and yes, I used to loathe capers too.  It’s funny how they both ended up in this spread.  I remember always asking a waitperson to omit the capers from anything I ordered.  Smoked salmon just smelled plain old fishy to me.  And then one day, I decided to stop being annoying and judging foods from some childhood notion I had of how they taste.  Just like that, I realized that they were actually good, really good.  Now, at brunch I am always torn between a smoked salmon platter (which most times includes capers) or some omelet or frittata or maybe pancakes, waffles or…As you can see I like EVERYTHING now.  I love the fact that I have gotten oven any hang-ups I used to have.  True confession:  I used to hate sushi/sashimi too.  Now, I simply cannot go a week without it.

I love when people are open-minded.  In this day and age, I see people having way too many issues about things when they haven’t even tried something or experienced something fully.  Go and dive into things and I’m sure most people will find more things they love than hate.  Of course, I feel this should be applied to all aspects of life.  However, since this blog is primarily about food, I would like to encourage all of us to get out of our culinary comfort zone and try something we think we dislike.  Imagine, something as everyday as smoked salmon was out of my comfort zone.  Things become part of our everyday and we do not even realize it.  That’s a great process of expanding the mind and more importantly, the taste-buds.

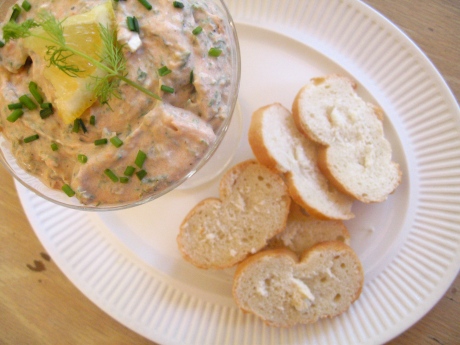
This smoked salmon spread is just what my taste-buds call out for.  My mind is calling out,” feeeeeeeeeeeed me,” most hours of the day and this spread surely satisfies my never-ending pit of an appetite.  Creamy and salty and soooo good!  Another benefit of this spread is that it is so simple.  I like to make dishes that have an elegance and oomph to them without too much effort.  The freshest ingredients will always yield the most delicious results, as is the case with this spread.

Smoked Salmon Spread with Dill, Chives, and Capers

Makes about 1 1/2 cups of spread

Ingredients

3 ounces of wild smoked salmon

1/2 cup creme fraiche

3/4 cup artisanal cream cheese (or regular cream cheese if you can’t find artisanal)

1 tablespoon capers (brine rinsed off)

2 tablespoons dill, chopped

15 sprigs of chives, chopped

juice of half a lemon

1 clove of garlic, chopped, optional

freshly ground black pepper to taste

Method

Pulse all of the ingredients in a food processor until just combined.  If you do not have a food processor, chop everything finely and mix all the ingredients together in a bowl until fluffy.  So easy!  Serve with crusty bread or some nice crackers.  This would also be great on a bagel.